Wednesday, October 8, 2014

How to make a foam wreath

DIY FoamWreath   wesens-art.blogspot.com
You need or want a foam / styrofoam wreath in a special size? 
This is a quick, easy and inexpensive solution! 
What you need: 
pipe insulation 
(you can buy it where ever you get plumbing hardware) 
cutting knife 
packaging tape 
scissors
Du brauchst oder willst einen Styropor-Kranz in einer besonderen Größe? 
Dies ist eine schnelle, einfache und kostengünstige Lösung! 
Was man braucht: 
Rohrisolierung 
(gibt es in jedem Baumarkt) 
Cuttermesser 
Paketklebeband 
Schere 
DIY FoamWreath   wesens-art.blogspot.com
All you have to do is cutting the pipe insulation in the lenght you want. Then bend it to a circle and fix it with packaging tape. 
You can wrap it with fabric or ribbons 
and stuck or glue things on it for decoration. 
Alle was man machen muss, ist die Rohrisolierung in die Länge zu schneiden, die man möchte. Dann zu einem Kreis biegen und mit Paketklebeband fixieren. 
Man kann ihn mit Stoff oder Bändern umwickeln 
und Dinge darauf stecken oder kleben. 

Here are some samples: 
Hier sind einige Beispiele: 
DIY FoamWreath sample   wesens-art.blogspot.com

DIY FoamWreath sample   wesens-art.blogspot.com

Visit and like me on Facebook!
Attention! It is not allowed to copy or use my posts, photos, pattern, templates or files for business or selling!!!
Wichtig! Es ist untersagt, meine Beiträge, Fotos, Schnittmuster, Vorlagen oder Dateien zu kopieren oder gewerblich oder zum Verkauf zu nutzen!!!
I’m sharing my projects with these fabulous linky parties: look here!

Wednesday, October 1, 2014

Vintage Style Memo Board

VintageStyleMemoBoard wesens-art.blogspot.com
What you need: 
canvas 
fabric 
batting 
lace ribbons 
rickrack 
beads 
stapler
needle & thread 
scissors
 Was man braucht: 
Leinwand 
Stoff 
Volumenvlies 
Spitzenbänder 
Zackenlitze 
Perlen 
Tacker 
Nadel & Faden 
Schere

VintageStyleMemoBoard wesens-art.blogspot.com
Cut the batting about 2 cm larger (each side) than the batting. 
Das Volumenvlies etwa 2 cm größer (an jeder Seite) als die Leinwand schneiden. 
VintageStyleMemoBoard wesens-art.blogspot.com
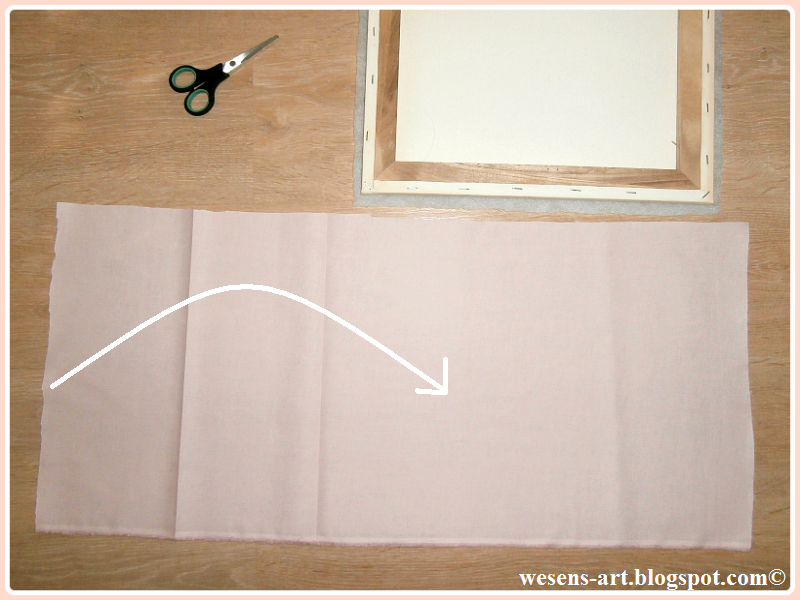
Cut and iron the fabric. Fold the fabric as shown in the next pictures.
Den Stoff schneiden und bügeln. Den Stoff so falten, wie in den nächsten Bildern gezeigt wird. 
VintageStyleMemoBoard wesens-art.blogspot.com
Sew lace ribbon onto the edge of the folded part of the fabric. 
Spitzenband auf den Rand des gefalteten Stoffs nähen. 
VintageStyleMemoBoard wesens-art.blogspot.com
Sew from the lace ribbon to the bottom of the fabric to build pockets. 
Von dem Spitzenband bis zum unteren Rand des Stoffs nähen, um Taschen zu bilden. 
VintageStyleMemoBoard wesens-art.blogspot.com
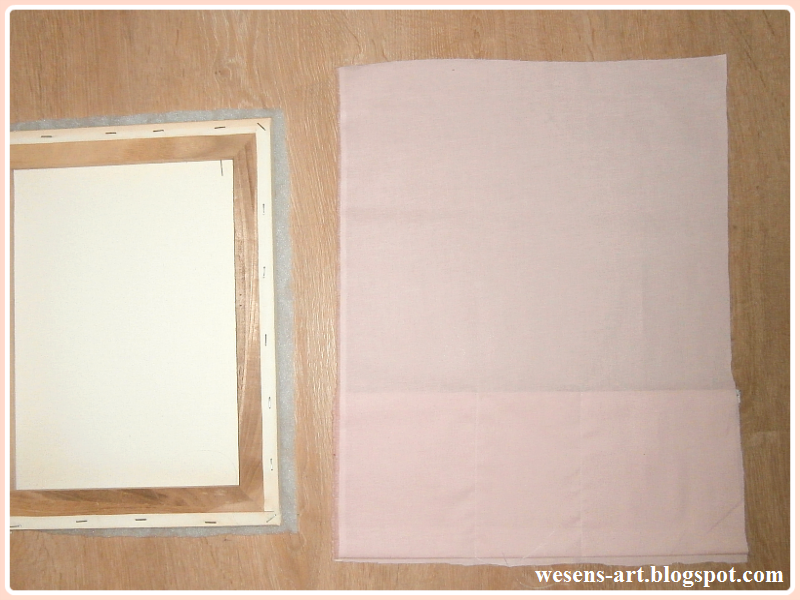
Place the canvas on the left side of the fabric. 
Die Leinwand auf die linke Seite des Stoffen legen. 
VintageStyleMemoBoard wesens-art.blogspot.com
Staple the fabric on the back of the canvas. 
Den Stoff auf die Rückseite der Leinwand heften.
VintageStyleMemoBoard wesens-art.blogspot.com
Place the rickrack (and lace ribbon) on the fabric and staple it on the back of the canvas. 
Zackenlitze (und Spitzenband) auf den Stoff legen und auf die Rückseite der Leinwand tackern. 
VintageStyleMemoBoard wesens-art.blogspot.com
Fix lace ribbon along the edges of the canvas. 
Spitzenband entlang der Ränder der Leinwand fixieren. 
VintageStyleMemoBoard wesens-art.blogspot.com
Sew some pearls onto the canvas for decoration and to attach the rickrack and the lace ribbons. 
Ein paar Perlen auf die Leinwand nähen, zur Dekoration und um damit Zackenlitze und Spitzenband zusätzlich zu befestigen.
VintageStyleMemoBoard wesens-art.blogspot.com
Ready to decorate and use! 
Fertig zum Dekorieren und Benutzen!
VintageStyleMemoBoard wesens-art.blogspot.com

Visit and like me on Facebook!

Attention! It is not allowed to copy or use my posts, photos, pattern, templates or files for business or selling!!!
Wichtig! Es ist untersagt, meine Beiträge, Fotos, Schnittmuster, Vorlagen oder Dateien zu kopieren oder gewerblich oder zum Verkauf zu nutzen!!!

Wednesday, September 24, 2014

Sunny potted plant / sonnige Topfpflanze

sunny potted plant   wesens-art.blogspot.com
Here I show you a different way to present a potted plant, 
whether as a gift or decoration. 
And it's quick and easy. 
What you need: 
potted plant 
metal bucket 
parts of a synthetic sunflower 
Hier zeige ich eine etwas andere Möglichkeit, eine Topfpflanze zu präsentieren, ob als Geschenk oder Dekoration. 
Was man braucht: 
Topfpflanze 
Metalleimer 
Teile einer künstlichen Sonnenblume
sunny potted plant   wesens-art.blogspot.com
I think you don't need instruction how to do it :-) 
Ich denke, ihr braucht keine Anleitung, wie es geht :-) 
sunny potted plant   wesens-art.blogspot.com
.
Visit and like me on Facebook!
Attention! It is not allowed to copy or use my posts, photos, pattern, templates or files for business or selling!!!
Wichtig! Es ist untersagt, meine Beiträge, Fotos, Schnittmuster, Vorlagen oder Dateien zu kopieren oder gewerblich oder zum Verkauf zu nutzen!!!

Wednesday, September 17, 2014

Crazy clay pot flower monsters / Tontopf Blumen Monster

ClayPotMonsters   wesens-art.blogspot.com
Here is my granddaughters latest creation: 
Crazy clay pot flower monsters! 
Currently, she is crazy about little cute monsters and wiggle eyes. 
What you need: 
mini clay pots 
finger paints 
wiggle eyes 
neon poms 
school glue 
pipe cleaner 
paint brush 
felt or soft foam
wooden flowers 
Hier ist die neueste Kreation meiner Enkelin: 
Verrückte Tontopf Blumen Monster! 
Derzeit ist sie verrückt nach kleinen niedlichen Monstern und Wackelaugen. 
Was man braucht: 
mini Tontöpfe 
Fingerfarben 
Wackelaugen 
neon Pompons 
Bastelkleber 
Pfeifenreiniger 
Pinsel 
Filz oder Moosgummi 
Blumen aus Holz 
ClayPotMonsters   wesens-art.blogspot.com
Paint the clay pots and the wooden flowers with fingerpaint. 
Glue the wiggle eyes onto the neon poms and let them dry. 
After drying glue the neon pom onto the edge of the clay pots. 
Then cut every pipe cleaner in 3 pieces and wrap them round the paint brush to make them curly. 
Take one pipe cleaner of each color and put them through the hole in the clay pots. Fix them with glue. 
Now cut a mouth out of felt or soft foam and glue it on the clay pot. 
Finally, glue the clay pots onto the wooden flower. 
Die Tontöpfe und die Bumen aus Holz mit Fingerfarbe bemalen. 
Die Wackelaugen auf die Pompons kleben und trocknen lassen. 
Nach dem Trocknen die Pompons auf den Rand der Tontöpfe kleben. 
Dann die Pfeifenreiniger jeweils in 3 Stücke schneiden und um den Pinsel wickeln, um sie zu kringeln. 
Einen Pfeifenreiniger von jeder Farbe in das Loch vom Tontopf stecken und mit Kleber fixieren. 
Nun aus Filz oder Moosgummi einen Mund schneiden und an den Tontopf kleben. 
Zuletzt die Tontöpfe auf die Blumen aus Holz kleben. 
ClayPotMonsters   wesens-art.blogspot.com

Visit and like me on Facebook!


Attention! It is not allowed to copy or use my posts, photos, pattern, templates or files for business or selling!!!
Wichtig! Es ist untersagt, meine Beiträge, Fotos, Schnittmuster, Vorlagen oder Dateien zu kopieren oder gewerblich oder zum Verkauf zu nutzen!!!

Wednesday, September 10, 2014

Stamping with kids / how to make a mini inkpad

StampingWithKids   wesens-art.blogspot.com
My granddaughter loves to stamp! 
But most of the inkpads are so big that she has more ink on her fingers than on the stamp. 
And we all know that it isn't easy to remove it. 
This is my solution for the small stamps I've made for her! 
What you need: 
plastic shot glasses (2 cl)
(one for each stamp and one for each color)
a sponge 
cutting knife 
double sided tape 
scissors 
small stamps 
Meine Enkelin liebt es zu Stempeln! 
Aber die meisten Stempelkissen sind so groß, dass sie mehr Farbe an den Fingern als auf dem Stempel hat. 
Und wir wissen alle, wie schwer die wieder ab geht. 
Dies ist meine Lösung für die kleinen Stempel, die ich für sie gemacht habe! 
Was man braucht: 
Schnapsgläser aus Kunststoff (2 cl) 
(eins für jeden Stempel und eins für jede Farbe) 
einen Schwamm 
Cuttermesser 
doppelseitiges Klebeband 
Schere 
kleine Stempel 
StampingWithKids   wesens-art.blogspot.com
Cut the sponge with the cutting knife. 
Den Schwamm mit Cuttermesser schneiden. 
StampingWithKids   wesens-art.blogspot.com
 Put pieces of the double sided tape to the bottom outside of the shot glasses to fix the stamps. And put pieces of the double sided tape to the bottom inside of the shot glasses to fix the sponge pieces. 
Klebestreifen auf die Böden außen an den Schnapsgläsern kleben, um die Stempel zu befestigen. Und Klebestreifen auf die Böden innen an die Schnapsgläser kleben, um die Schwammstücke zu befestigen. 
StampingWithKids   wesens-art.blogspot.com
Now it's time to put a few drops (not too much) of color onto the sponges. Fill a few drops of water into the shot glass with the thicker sponge.
You can use water colors, finger paints or what you want. 
(I've used finger paints.) 
Jetzt ist es Zeit, ein paar Tropfen (nicht zu viel) Farbe auf die Schwämmchen zu geben. In das Glas mit dem dickeren Schwamm ein paar Tropfen Wasser geben.
Man kann Wasserfarben, Fingerfarben oder was man möchte verwenden. 
(Ich habe Fingerfarben benutzt.)
StampingWithKids   wesens-art.blogspot.com
Stuck the shot glass with the stamp into the color. You don't need to press, just turn the glass with the stamp. 
Das Schnapsglas mit dem Stempel in die Farbe stecken. Man braucht nicht zu drücken, einfach das Glas mit dem Stempel etwas drehen. 
StampingWithKids   wesens-art.blogspot.com
Now you can stamp.
The color also doesn't run out if the shot glass tips over! 
Nun kann man stempeln. 
Die Farbe läuft auch nicht aus, wenn das Glas umkippt! 
StampingWithKids   wesens-art.blogspot.com
Stuck the shot glass with the stamp into the glass with the watered sponge to clean the stamp. 
Um den Stempel zu reinigen steckt man ihn in das Schnapsglas mit dem gewässerten Schwamm. 
StampingWithKids   wesens-art.blogspot.com
Stuck the shot glasses into each other for storage. 
First the shot glasses with the color and over them the shot glasses with the stamps. The shot glass with the watered sponge to the top. 
Die Gläser zur Aufbewahrung ineinander stecken. 
Erst die Glässer mit der Farbe, darüber die mit den Stempeln und nach oben das Schnapsglas mit dem gewässerten Schwamm. 
StampingWithKids   wesens-art.blogspot.com
Visit and like me on Facebook!


Attention! It is not allowed to copy or use my posts, photos, pattern, templates or files for business or selling!!!
Wichtig! Es ist untersagt, meine Beiträge, Fotos, Schnittmuster, Vorlagen oder Dateien zu kopieren oder gewerblich oder zum Verkauf zu nutzen!!!
Related Posts Plugin for WordPress, Blogger...