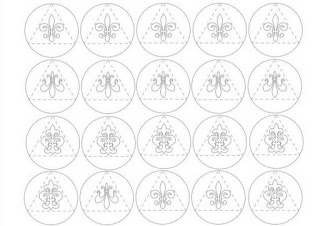
Was man braucht:
festes Papier
Transparentpapier
Kleber
Schere
(Motivstanzer)
What you need:
Cardstock
Transparent paper
Glue
Scissor
(Craft punchers)
20 Kreise (mit einem gleichschenkligen Dreieck als Falzlinien drin) erstellen.
Create 20 circles (with equilateral triangle as fold lines).
Die Kreise ausschneiden und mit Transparentpapier die ausgeschnittenen / ausgestanzten Motive überkleben.
Cut out the circles and stick transparent paper onto the cut / punched motifs.
Nun die Kreise umdrehen, und entlang der Faltlinien falten.
Now turn the circles and fold along the fold lines.
Nun die Teile zusammenkleben.
Now stick the pieces together.
Ohne Licht:
Without lights:
Mit Licht:
With lights:
Und wie man die Wollkugeln macht, zeige ich in ein paar Tagen!
And in a few days I will show how to make the woolen balls!


Very sweet - I have seen quite a few variations of these in the last couple of weeks and may be forced to have a go at making them now I have instructions!
ReplyDeleteI tried this about a year ago (couldn't find a tutorial then) and it was HARD!!!!
ReplyDeleteVery pretty especially when lighted. Very creative!
ReplyDeleteThose look fabulous! I should get the kids to help me make some of those. Thanks for sharing! :)
ReplyDeleteWow, thank you for the tutorial. I would have thought it was more difficult but you make it look easy.
ReplyDeleteWe may have met by chance...but we become friends by choice.
http://simpleesue.com/try-one-new-recipe-a-week-mexican-pizza
These look wonderful! We used to do this project with old Christmas cards.
ReplyDeleteBeautiful old fashioned ornaments! Thanks for sharing. Joining from Inspire me Monday - http://allthoseartsygirls.blogspot.com/
ReplyDeleteSo pretty!!
ReplyDeleteThanks for linking to a Round Tuit!
Hope you have a fabulous week!
Jill @ Creating my way to Success
http://www.jembellish.blogspot.com/
Love it! I've seen these before, but was never sure how to make them. I pinned your post for future reference.
ReplyDeleteThese are so pretty, its incredible what you can create from paper :)
ReplyDeleteI used to make these as a child - but never with lights - absolutely stunning!! Thanks for sharing.
ReplyDeleteI'm stopping by from "Adorned from Above" blog hop - I'm already a follower of yours.
Thanks
Angie
godsgrowinggarden.com
Oh WOW!! So whimsical! LOVE IT!!
ReplyDeleteThanks so much for sharing this at The DIY Dreamer... From Dream To Reality!
Beautiful little lights! Thanks so much for sharing at Get Schooled Saturday:)
ReplyDeleteKim
You make it look so easy !!
ReplyDeleteThese are pretty. Thanks for the how-to. I am visiting from Bear Rabbit Bear,Things I've Done Thursday.
ReplyDeleteThanks for linking up! Hope to see some of your great ideas again this week on 'Or so she says ...' www.oneshetwoshe.com
ReplyDeletethese are so pretty thanks for sharing on Serenity Saturday link party
ReplyDeleteThese are sooo pretty! I love them with the lights! Thanks so much for sharing with the Pink Hippo Party!
ReplyDeletexoxo
Amie @ Pinkapotamus
What a pretty idea! I would really like to try this with my little girls. They would love it!
ReplyDeleteOooh, I love your little paper globes! They look especially pretty with the lights :-)
ReplyDeleteI love making these christmas decorations from colored paper. so fun. HAPPY THANKSGIVING! (don't know if you will be celebrating that where you are living.) We'll have a linky party tomorrow but the blog will be 'closed for business' on Thursday. That is: all the free Thanksgiving coloring pages etc. will be downloadable but I won't be turning on that computer...
ReplyDeleteHow fun!! I always wanted to know how to make those. Thank you so much for sharing at Sharing Saturday!!
ReplyDeleteThank you, now for the fun to start. xxx
ReplyDelete