12 Zungenspatel
farbiges Papier
Schleifenband
Streublumen
Schere
Stift
Bastelkleber
What you need:
12 Tongue Depressors
colored paper
ribbon
little deco flowers
scissors
pencil
school glue
Aus dem Papier mehrere Schmetterlinge ausschneiden.
Cut out some butterflies from the paper.
Die Flügel hoch knicken.
Fold the wings like it is shown in the photo.
Nun die Flügel um einen Stift biegen.
Now bend the wings around the pen.
Je 6 Zungenspatel wie auf dem nächsten Foto gezeigt übereinander legen und aneinander kleben.
Put each 6 tongue depressors like shown on the next photo and glue them together.
Jetzt beide Sechsecke versetzt übereinander kleben.
Glue both hexagons displaced together.
Schleifenband um den Kranz wickeln.
Wrap the ribbon round the wreath.
Schmetterlinge auf den Kranz kleben.
Glue the butterflies onto the wreath.
Nun die Streublumen ankleben.
Now glue the little deco flowers onto the wreath.
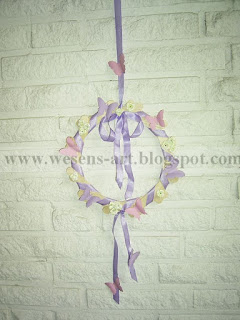
Mit noch etwas Schleifenband dekorieren und fertig ist der Frühlings-Kranz!
Decorate with some more ribbon and butterflies and ready is the spring wreath!

Wichtig! Es ist untersagt, meine Beiträge, Fotos, Schnittmuster, Vorlagen oder Dateien zu kopieren oder gewerblich oder zum Verkauf zu nutzen!!!
Wrap the ribbon round the wreath.
Schmetterlinge auf den Kranz kleben.
Glue the butterflies onto the wreath.
Nun die Streublumen ankleben.
Now glue the little deco flowers onto the wreath.
Mit noch etwas Schleifenband dekorieren und fertig ist der Frühlings-Kranz!
Decorate with some more ribbon and butterflies and ready is the spring wreath!

Wichtig! Es ist untersagt, meine Beiträge, Fotos, Schnittmuster, Vorlagen oder Dateien zu kopieren oder gewerblich oder zum Verkauf zu nutzen!!!
Attention! It is not allowed to copy
or use my posts, photos, pattern, templates or files for business or selling!!!


How cute. I haven't seen wreaths made from lolly sticks before - thanks for sharing the idea!
ReplyDeletevery cute!!
ReplyDeleteVery pretty! Thanks for linking up!
ReplyDeleteThis is so adorable! What a great idea to make your own wreath frame from the wooden sticks.
ReplyDeleteSaw you sharing at Serenity Now Weekend Bloogy Reading Party
Debbie :)
Lovely !
ReplyDeleteAnna
Another beautiful craft from your hands! They that each 5 minut that passes, a butterfly dies :-) so great you're bringing some new to life!
ReplyDeleteCute wreath! I love the spring colors. I hope you stop by to link- http://atozebracelebrations.com/2013/02/link-party-9.html
ReplyDeleteNancy
Those are great step-by-step instructions. My kids love to play with crafts sticks. This is a great project because it can easily have so many different themes.
ReplyDeleteLove this. Happy Spring to you!!
ReplyDeleteHow beautiful! I love that you made the wreath with tongue depressors! Thank you for sharing at Sharing Saturday!
ReplyDeleteThanks for sharing an awesome project with us! Come by again next week and share another cool project with us!
ReplyDeleteHave a great week!
Susie @bowdabra
http://bowdabrablog.com/2013/03/02/crafty-showcase-link-up-anything-fun-in-the-craft-project-linky-3/
Very pretty! Thanks for sharing at Fluster's Creative Muster. I'm looking forward to seeing what you link up next week.
ReplyDeleteWonderful tutorial! I loved the outcome!
ReplyDeleteGreat post!! I included it in my post Βόλτα στη Γειτονιά #24 :)
Have a great week!!
Very beautiful spring wreath love it.
ReplyDeleteERIKA