Es ist ganz einfach!
It is very easy!
Was man braucht:
Holztablett
Acrylfarbe
Schwamm
Selbstklebende Folie
Klarlack
What you need:
wooden tray
acrylic paint
sponge
selfadhesive film
clear varnish
Das Motiv spiegelverkehrt auf die Rückseite der selbstklebenden Folie drucken und ausschneiden.
(Dieses Motiv habe ich hier gefunden: The Graphics Fairy)
Nun weiße Acrylfarbe mit einem Schwamm dünn auf das Holztablett auftragen und trocknen lassen.
Print the design mirrored onto the back of the selfadhesive film and cut it out.
(I found this design here: The Graphics Fairy)
Paint the white acrylic paint in a thin layer with the sponge on the tray and let it dry.
Das ausgeschnittene Motiv auf das Tablett kleben.
Stick the selfadhesive film on the tray.
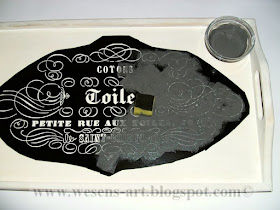
Nun graue Acrylfarbe mit einem Stück Schwamm auf das Motiv tupfen.
Dab gray acrylic paint on the design with a piece of a sponge.
Jetzt die Folie entfernen und die Farbe trocknen lassen.
Now remove the film and let the paint dry.
Etwas Asche auf das Tablett streuen und mit den Fingern verreiben.
Sprinkle some ash on the tray and rub it on with your fingers.
Zum Schluss ein oder zwei Schichten Klarlack auftragen.
For the finish spray one or two layers of clear varnish on it.

Wichtig! Es ist untersagt, meine Beiträge, Fotos, Schnittmuster, Vorlagen oder Dateien zu kopieren oder gewerblich oder zum Verkauf zu nutzen!!!
Attention! It is not allowed to copy
or use my posts, photos, pattern, templates or files for business or selling!!!
This was a project for:


Wieso entsteht denn nach dem Drucken die Schablone? Schmilzt die Folie im Drucker?
ReplyDeleteLG
Claire
Das Motiv spiegelverkehrt auf die Rückseite der selbstklebenden Folie drucken und anschließend das Motiv entlang der gedruckten Linien ausschneiden!
DeleteDanke! :) Ich hatte Hoffnung es könnte einfacher werden... ^^ Es ist also die gleiche Technik, die ich mit Freezerpapier und Stoff nutze.
DeleteI love this tray!! what kind of folie did you use?
ReplyDeleteI have used Oracal 631 but you can use nearly every selfadhesive film.
DeleteBeautiful! I love the design you picked!
ReplyDeleteStopping by from Seven Alive Linky Party...
I have a try that has been waiting for a makeover. This would make a good solution. Thank you for sharing at Fluster's Creative Muster.
ReplyDeleteRobin
Fluster Buster
Great looking tray! Thanks for a fine tutorial!
ReplyDeleteHallo,
ReplyDeleteda hast du wieder ein tolles Teilchen gemacht. Und was für eine Wahnsinnsarbeit mit dem Ausschneiden des filigranen Musters.
Liebe Grüße,
Simone
Vielen lieben Dank für deine Verlinkung!
wanted to invite you to my link party where we pin all those who join to our party board
ReplyDeletehttp://myfashionforwardblog.com/2013/05/23/all-things-pretty-9/
That is so clever and effective, thanks for sharing.
ReplyDeleteLove this! I'm stopping by from Inspire me Monday :)
ReplyDeleteSo cute! I love the graphic you chose! Would love it if you would link this up to Give Me The Goods Monday: 1 Party, 4 Blogs! http://www.rainonatinroof.com/2013/05/give-me-goods-monday-link-party-10.html
ReplyDeleteJenna @ Rain on a Tin Roof
Oh I love your graphic, great makeover. Hugs, Marty
ReplyDeleteDropping by from 'Show Me What You've Got' - that's so simple and incredibly effective, fabulous :)
ReplyDeleteI love how your tray turned out! I'm in love with anything French :)
ReplyDeleteI'm visiting you today from Sugar Bee. I co-host a Linky Party Tuesday (open thru Sat) and I'd love for you to link up! I hope you get a chance to stop by, link up and leave a comment, too!
~ Megin of VMG206
Join me each Tuesday for Brag About It Link Up Party
I would love to take breakfast in bed on that lovely tray!! :)
ReplyDeleteThanks for sharing it Monday Funday!
Wishing you An Extraordinary Day!
Hi there! I am co-hosting this week on Friend Connect Blog Hop. Thanks for connecting up!
ReplyDeleteI also host a TGIF Link Party over at my place -- A Peek Into Paradise... http://apeekintomyparadise.blogspot.com/ Would love for you to link up, Opens on Fridays and stays open until Wednesday at midnight. Thanks again for visiting the Friend Connect Blog Hop!
Have a terrific week!
Hugs, Cathy
This tray is so pretty!
ReplyDeleteVisiting from Inspire Me Monday :)
I'd love it if you shared this on Much Ado About Monday: http://www.huckleberrylove.com/2013/05/much-ado-about-monday-no-11.html
Karla
www.huckleberrylove.com
Psst! We at thet2women just loved this post and your blog and plan to feature it THIS Saturday over at One Sharendipity Place!! Thanks so much for linking up with us this past week!! We’re very glad you did!!
ReplyDeletesue@ thet2women.com
The tutorial is wonderful! Very creative.
ReplyDeleteThanks for sharing this at the BeBetsy BRAG ABOUT IT Tuesday party. Post is just great!
Link up again next week BeBetsy Link and Hop
The best to you,
Sharon and Denise
That's a fun creative project. Thank for linking with Hobbies and Handicrafts.
ReplyDeleteI love this! Love the vintage touch you've added.
ReplyDeleteThank you for linking up at HickoryTrail
ReplyDeleteBeautiful!! Thank you for sharing at Sharing Saturday!
ReplyDeleteThis is so pretty! Well done. :)
ReplyDeleteThanks so much for linking up to Much Ado About Monday. We can't wait to see what you have in store for us next week!!
Have a great weekend,
Jamie
www.huckleberrylove.com
This is gorgeous! And such a great tutorial. Thanks for sharing at Give Me The Goods Monday!
ReplyDeleteJamie @ Better With Age
This is such a fun project!!! So glad that you shared with Give Me the Goods Monday Link Party!
ReplyDeleteAmy @ www.commona-myhouse.blogspot.com
So beautiful! Thanks for sharing at Monday Funday this week!
ReplyDeleteTake cre,
Trish