Was man braucht:
MDF Brett
Jute (oder auch Sackleinen oder Rupfen genannt)
Bastelkleber
Acrylfarbe
ein Stück Schwamm
Schablone
Band
kleines Reagenzglas
Bohrmaschine
Heftgerät (Tacker)
What you need:
MDF board
burlap
school glue
acrylic paint
a piece of a sponge
stencil
ribbon
small test tube
power drill
stapler
Bastelkleber auf das Brett auftragen und Jute darauf legen und glatt streichen. Gut trocknen lassen.
Apply school glue to the MDF board, place the burlap on it and smooth it. Let it dry well.
Nun die Schablone ( ich habe sie selbst gemacht, aus selbstklebender Folie) auf das Brett legen.
Now place the stencil (I done it by myself of self adhesive film) on the board.
Acrylfarbe mit dem Stück Schwamm auftupfen.
Dab acrylic paint on it with the piece of a sponge.
Schablone abziehen.
Remove the stencil.
Zwei Löcher bohren.
Drill two holes.
Band durch die Löcher fädeln.
Pull ribbon through the holes.
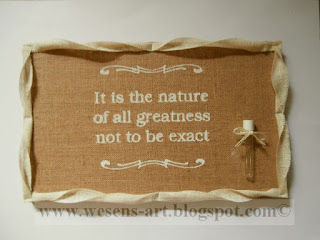
Das Reagenzglas festbinden.
Tie down the test tube.
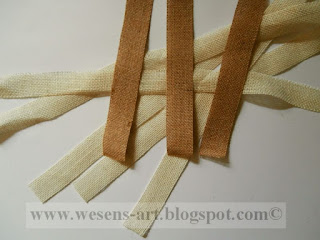
Jute in Streifen schneiden.
Cut burlap into stripes.
Mit einem Heftgerät Bänder gedreht an die Ränder tackern.
Tack stripes on the edges with a stapler.
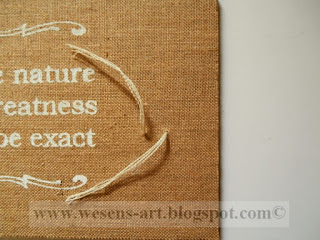
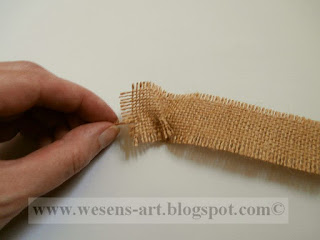
An beiden Seiten von einem Jute-Streifen an einem Faden ziehen und zusammen schieben.
Pull on both sides of a burlap stripe and push it together.
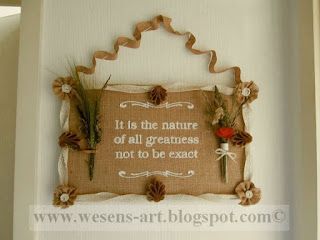
Nun das Brett dekorieren.
Und ein Band zum Aufhängen an der Wand anbringen.
Now decorate the MDF bord.
Make a screw hook on both sides and pull ribbon through it to hang it on a wall.
Eine kleine Holz-Wäscheklammer aufkleben und mit Pflanzen dekorieren.
Glue a small wooden clothes pin on the left side and decorate with some flowers.

Wichtig! Es
ist untersagt, meine Beiträge, Fotos, Schnittmuster, Vorlagen oder Dateien zu
kopieren oder gewerblich oder zum Verkauf zu nutzen!!!
Attention! It is not allowed to copy
or use my posts, photos, pattern, templates or files for business or selling!!!
This was a project for:







How pretty!! Found your post at The Inspiration Exchange party. Hope you have a fabulous evening!
ReplyDeleteDanielle
SewMuchCrafting.com
I love the burlap flowers! Thanks for sharing!
ReplyDeleteRobin @ Fluster Buster
What a neat wall hanging!
ReplyDeleteI hope you link up with us on
http://www.sowderingabout.com/2013/06/on-display-monday-linkup-6.html
this is beautiful and so simple (at least u make it look that way) I love working with burlap, it is so versatile and eco-chic. Roechelle @ http://www.hugatreewithme.com
ReplyDeletealways such gorgeous & inspirational work hun! love this!
ReplyDeleteThank you so much for linking up @ Inspire Me Fridays!
Have you linked up with the Friday Flash Blog Linky Party yet? Link up your ONE best post of the week and check out other people's awesome entries. You may just get highlighted next week!
ReplyDeleteJennifer @ The Jenny Evolution
http://thejennyevolution.com/category/linky-parties/friday-flash-blog/
I love your burlap sign! Thanks for the tutorial!
ReplyDeleteRitchil
http://chengand3kids.blogspot.com/
What a cute burlap sign. Love it!
ReplyDeleteFollowin you on BlogLovin.
Have a wonderful weekend,
Bev
@ Eclectic Red Barn
I love your fun sign and also the thought! I tell myself all the time when doing design, Only God is perfect!! LOL!
ReplyDeleteThis turned out so well. Thanks for sharing the great tutorial.
ReplyDeleteHeidi’s Wanderings
I love the detail!
ReplyDeleteI found your website from Southern Lovely. I just started a new blog and I would love for you to follow me, too! http://naptimenothings.blogspot.com/
Looking forward to more posts!
Sarah@
Naptime Nothings
Liebe Ilona,
ReplyDeleteherzlichen Glückwunsch zum 1.Platz des One Crafty Contest.
Hab eine schöne Woche,
Simone
Vielen lieben Dank, auch für deine Unterstützung!!!
DeleteThank you so much for sharing this. So cute!! I am visiting from Cornerstone Confessions.
ReplyDeleteStopping by from Friend Connect Blog Hop.
ReplyDeleteCohost @JLenniDorner
Very cool idea there.
Thank you so much for linking-up at Pin It Monday Hop#14. We appreciate for taking the time to share your post with us. If you have extra time, please stop by and check what other Bloggers are sharing. See you
ReplyDeleteJudy
Pursuit Of Functional Home
I love how the materials in the sign give a feeling of country living and a slower paced life. It is very nice.
ReplyDeleteI'll be featuring you this week @ Inspire Me Fridays, thank you for sharing such a beautiful project & wonderful tutorial!
ReplyDeletexx
Super cute! Thank you for sharing on the Clever Chicks Blog Hop this week!
ReplyDeleteKathy Shea Mormino
The Chicken Chick
http://www.The-Chicken-Chick.com
Hi! Stopping in from the Lovely Crafty Weekend Link-up. I love this sign! Your tutorial makes it look so easy.
ReplyDelete