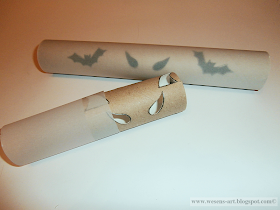
It is so easy!
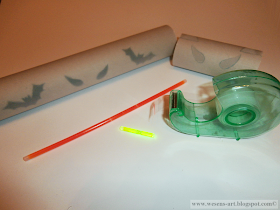
What you need:
paper rolls
glow sticks
transparentpaper
scissors
pencil
Scotch tape
Es ist so einfach!
Was man braucht:
Papierrollen
Knicklichter
Transparentpapier
Schere
Bleistift
Klebefilm
Activate the glow sticks and fix them with the tape inside the rolls.
Die Knicklichter aktivieren und mit dem Klebefilm im Inneren der Rollen befestigen.
And so it looks in the dark:
Uns so sieht es im Dunkeln aus:

Attention! It is not allowed to copy
or use my posts, photos, pattern, templates or files for business or selling!!!
Wichtig! Es
ist untersagt, meine Beiträge, Fotos, Schnittmuster, Vorlagen oder Dateien zu
kopieren oder gewerblich oder zum Verkauf zu nutzen!!!


Genial!!!
ReplyDeleteLG, Claudia
Great Idea! Love this. You just have THE BEST CRAFT IDEAS! In reply to your request to clarify 'what is a "se y"- photo, Couldplease me the original photo for this project and I shall demonstrate it, okay?! ~ Rose
ReplyDeleteWhat a cute idea and great for the kids to join in and have some fun decorating. Visiting you from the Whimsy Wednesday.
ReplyDeleteWhat a fun idea for Halloween! I'm sure this is a popular activity with kids.
ReplyDeleteOh, that is spooky and fun, too! Very clever idea!
ReplyDeleteoh boy... I know a little boy who would LOVE this! Thanks for the post!
ReplyDeleteSuper cool idea! Thank you for sharing at our Pinning for Play link party!
ReplyDeleteSo so cute...great idea.
ReplyDeleteOver from Sunday Best and about to follow you.
Oh my goodness, this is way too cute. What a fun idea for kids. I am going to have to make these, even just setting them on the front porch at night would be a blast. Thanks for sharing how you made them.
ReplyDeleteI’d love it if you linked this up over at Living Well Spending Less for Thrifty Thursday this week! http://www.livingwellspendingless.com/category/thrifty-thursday/
I love these!!! My boys will love making them, thanks for linking up at Monday Funday!
ReplyDeleteMy son is going to love making these! I've pinned already. Thanks for sharing at Inspire Us Thursday on Organized 31.
ReplyDeleteWhat a neat idea!!
ReplyDeleteThanks for joining the Link Up this week!
These are super cute! What a great project idea, my son will love it!
ReplyDeleteI linked over from the Craftastic Link Party where I am participating with my
Thank You Card
I would love it if you'd stop by.
Hugs, antonella :-)
This is such a fantastic idea!! and definitely one I will be doing with the kids this Halloween. I'll be featuring these tomorrow on Serenity Saturday link party
ReplyDeleteNatasha @ Serenityyou
Great idea!! I love how simple this is! I'll be featuring this post tomorrow on our Blog Hop Link Party for Pinning for Play. Check it out if you want to! http://tipsfromatypicalmom.blogspot.com
ReplyDeleteThis is a cute DIY!! I always wanted to make something like this! Thanks for linking up to my DIY Crush Craft Party!
ReplyDeleteWhat a cool idea! I imagine that the kids will have a great time with these running around at night, how fun!
ReplyDelete