Sunday, October 26, 2014

Leopard Paw Prints on the gateway / Leopard Pfotenabdrücke

LeopardPawsGateway wesens-art.blogspot.com
How to make paw prints on your gateway for Halloween. 
(Not only for Halloween! You can also use this tutorial to make any designs on your gateway - for example some flourish or words for your party) 
What you need: 
chalk 
hammer 
plastic bag 
paintbrush 
bowl 
water 
template with paw print 
(I've used one with a leopard paw from the WWF Germany) 
Wie man Pfotenabdrücke für Halloween auf die Einfahrt macht. 
(Nicht nur für Halloween! Man kann mit diesem Tutorial jedes Design machen, z.B. Schnörkel oder Worte für eine Party) 
Was man braucht: 
Kreide 
Hammer 
Plastikbeutel 
Schale 
Wasser 
Schablone mit Pfotenabdruck 
(Ich habe eine Schablone mit Leopard Pfotenabdruck vom WWF Deutschland genommen) 
LeopardPawsGateway wesens-art.blogspot.com
Put the chalk in the plastic bag, close it with a knot and knock it with the hammer...
Kreide in die Tüte geben, mit einem Knoten verschließen und mit dem Hammer drauf schlagen...
LeopardPawsGateway wesens-art.blogspot.com
...till it is fine enough. 
...bis es fein genug ist. 
LeopardPawsGateway wesens-art.blogspot.com
Fill it in the bowl and stir it with a bit water. 
After stirring wait a few minutes. 
In die Schale füllen und mit etwas Wasser verrühren. 
Nach dem Verrühren ein paar Minuten warten. 
LeopardPawsGateway wesens-art.blogspot.com
Put the template on your gateway and dab the paint with the paintbrush on it. 
Die Schablone auf den Boden der Einfahrt legen, und die Farbe mit dem Pinsel auftupfen. 
LeopardPawsGateway wesens-art.blogspot.com
Remove the template. This is how it looks when it's wet:
Die Schablone entfernen. So sieht es nass aus: 
LeopardPawsGateway wesens-art.blogspot.com
...and dried: 
...und getrocknet: 
LeopardPawsGateway wesens-art.blogspot.com
It starts to rain? 
That is not a big problem, the chalk will stay. 
Es beginnt zu regnen? 
Das ist kein großes Problem, die Kreide bleibt. 
LeopardPawsGateway wesens-art.blogspot.com
 After one hour: 
(after drying you can see the paws again)
Nach einer Stunde: 
(nach dem Trocknen kann man die Pfotenabdrücke wieder sehen) 
LeopardPawsGateway wesens-art.blogspot.com
If you want to remove the paw print you have to pour water on it and lightly scrub with a broom. 
Wenn man die Pfotenabdrücke entfernen möchte, gießt man Wasser drauf und schrubbt leicht mit einem Besen drüber. 
LeopardPawsGateway wesens-art.blogspot.com
Here are some photos from my gateway last year. 
Hier ein paar Fotos von meiner Einfahrt im letzten Jahr. 
LeopardPawsGateway wesens-art.blogspot.com
And now some photos of 2014! 
Und nun ein paar Fotos von 2014! 
LeopardPawsGateway wesens-art.blogspot.com
Paper plates as eyes: 
Pappteller als Augen: 
LeopardPawsGateway wesens-art.blogspot.com

Visit and like me on Facebook!
Attention! It is not allowed to copy or use my posts, photos, pattern, templates or files for business or selling!!!
Wichtig! Es ist untersagt, meine Beiträge, Fotos, Schnittmuster, Vorlagen oder Dateien zu kopieren oder gewerblich oder zum Verkauf zu nutzen!!!

Wednesday, October 22, 2014

Halloween Wreath / Halloween-Kranz

HalloweenWreath  wesens-art.blogspot.com
Here is the photo tutorial for my Halloween wreath. 
What you need: 
foam wreath 
crepe paper 
black ribbon 
black pencil 
tissue 
styrofoam ball 
thread 
paper bats 
paper letters 
scissors
 Hier ist das Foto-Tutorial für meinen Halloween Kranz. 
Was man braucht: 
Kranz-Rohling 
Krepp-Papier 
schwarzes Band 
schwarzen Stift 
Papiertuch 
Styroporkugel 
Faden 
Papier-Fledermäuse 
Papier-Buchstaben 
Schere 
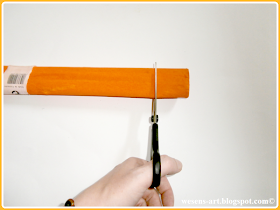
HalloweenWreath  wesens-art.blogspot.com

HalloweenWreath  wesens-art.blogspot.com

Visit and like me on Facebook!

 
Attention! It is not allowed to copy or use my posts, photos, pattern, templates or files for business or selling!!!
Wichtig! Es ist untersagt, meine Beiträge, Fotos, Schnittmuster, Vorlagen oder Dateien zu kopieren oder gewerblich oder zum Verkauf zu nutzen!!!

Wednesday, October 15, 2014

Crazy Pumpkins

CrazyPumpkins  wesens-art.blogspot.com
These were the pumpkins before my granddaughter found them: 
Das waren die Kürbisse, bevor meine Enkelin sie fand: 
CrazyPumpkins  wesens-art.blogspot.com
 After a funny painting with finger paints let them dry and glue wiggly eyes on it. 
Nach dem spaßigen Bemalen mit Fingerfarben trocknen lassen und mit Wackelaugen bekleben. 
CrazyPumpkins  wesens-art.blogspot.com
And my granddaughter wanted a photo of herself with her painted pumpkins. 
Und meine Enkelin wollte ein Foto von sich mit ihren bemalten Kürbissen.
CrazyPumpkins  wesens-art.blogspot.com

Visit and like me on Facebook!

Attention! It is not allowed to copy or use my posts, photos, pattern, templates or files for business or selling!!!
Wichtig! Es ist untersagt, meine Beiträge, Fotos, Schnittmuster, Vorlagen oder Dateien zu kopieren oder gewerblich oder zum Verkauf zu nutzen!!!
I’m sharing my projects with these fabulous linky parties: look here!

Wednesday, October 8, 2014

Fall Wreath with DIY foam wreath

FallWreath   wesens-art.blogspot.com
The leaves are falling - time for a fall wreath! 
 But I could not find a styrofoam wreath in the size I was looking for, so I had to make a foam wreath by myself and decorate it.
Here is the link to the tutorial how I made it!

What you need for the fall wreath: 
foam wreath 
burlap ribbon 
jungle grass / reindeer moss 
mini plastic toadstools 
felt leaves 
wooden letters 
raffia 
hot glue gun 
little deer 

Die Blätter fallen - Zeit für einen Herbst-Kranz! 
Aber ich konnte keinen Styroporkranz in der Größe finden, die ich suchte, also hab ich selbst einen gemacht und dekoriert.
Hier ist der Link zu dem Tutorial, wie ich das gemacht habe. 

Was man für den Herbst-Kranz braucht: 
Kranz 
Juteband 
Dschungelgras / Island Moos 
mini Plastik Fliegenpilze 
Filz-Blätter 
Holzbuchstaben 
Bast 
Heißklebepistole 
kleines Reh 
FallWreath   wesens-art.blogspot.com
And here is the template for the little deer if you want to make it by yourself: 
Und hier ist Vorlage für das kleine Reh, wenn du es selbst machen willst: 
FallWreath   wesens-art.blogspot.com
Wrap the burlap ribbon around the wreath. 
Das Juteband um den Kranz wickeln. 
FallWreath   wesens-art.blogspot.com
Glue the jungle grass / reindeer moss onto the lower side of the wreath. 
Das Dschunglegras / Island Moos auf die untere Seite des Kranzes kleben. 
FallWreath   wesens-art.blogspot.com
Glue the little deer onto it and stuck the toadstools to the grass / moss. Then glue the felt leaves and the wooden letters to the upper side of the wreath. 
Bind the raffia to the top of the wreath and it's done!
Das kleine Reh darauf kleben und die Pilze in das Gras / Moos stekcen. Dann die Filz-Blätter und die Holzbuchstaben an die obere Seite des Kranzes kleben. 
Den Bast oben anbinden und es ist geschafft!
FallWreath   wesens-art.blogspot.com

Visit and like me on Facebook!


Attention! It is not allowed to copy or use my posts, photos, pattern, templates or files for business or selling!!!

Wichtig! Es ist untersagt, meine Beiträge, Fotos, Schnittmuster, Vorlagen oder Dateien zu kopieren oder gewerblich oder zum Verkauf zu nutzen!!!