This time I will show you how to make key chains out of faux leather paper.
Why faux leather paper?
It is washable, durable, ironable, sewable, glueable, stampable... And it is cuttable with scissors, cutting knives or electronic cutting machines!
And here I will show a tutorial to cut this key chains with the Silhouette Cameo (but this tutorial is also for Silhouette Portrait or Curio).
What I've used:
Silhouette Faux Leather Paper
heat transfer vinyl
key ring
school glue
Diesmal zeige ich, wie man Schlüsselanhänger aus Kunstleder Papier macht.
Warum Kunstleder Papier?
Es ist waschbar, strapazierfähig, bügelbar, nähbar, verklebbar, bestempelbar... Und es ist schneidbar mit Schere, Cuttermesser oder Schneideplotter!
Und hier zeige ich eine Anleitung zum Schneiden dieser Schlüsselanhänger mit dem Silhouette Cameo (aber es geht genauso mit Silhouette Portrait oder Curio).
Was ich benutzt habe:
Silhouette Faux Leather Paper (Kunstleder Papier)
Flexfolie (Bügelfolie)
Schlüsselring
Bastelkleber
I will show 2 photos for every step, one for the english version and one for the german version.
I werde 2 Fotos zu jedem Schritt zeigen, eins für die englische Version und eins für die deutsche Version.
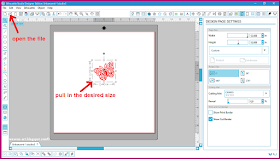
Step 1 / Schritt 1
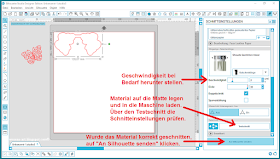
Step 2 / Schritt 2
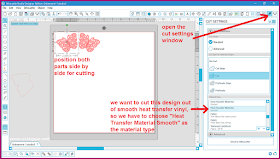
Step 3 / Schritt 3
Step 4 / Schritt 4
Step 5 / Schritt 5
Step 6 / Schritt 6
Step 7 / Schritt 7
Step 8 / Schritt 8
Step 9 / Schritt 9
Step 10 / Schritt 10
Step 11 / Schritt 11
Step 12 / Schritt 12
Step 13 / Schritt 13
Step 14 / Schritt 14
Step 15 / Schritt 15
Step 16 / Schritt 16
This are the results:
Dies sind die Ergebnisse:
Press the heat transfer vinyl with the iron to the faux leather paper.
Die Flexfolie auf das Kunstleder Papier mit dem Bügeleisen aufpressen.
Apply glue on one part of the backside of the design
(no glue on the connection part).
Kleber auf einen Teil der Rückseite des Motivs aufragen
(kein Kleber auf das Verbindungteil).
Fold the two sides exactly one on another and let the glue dry.
Beide Seiten genau aufeinander kleben und trocknen lassen.
Attach the key ring and it's done!
Den Schlüsselring anbringen, fertig!
Heat transfer vinyl on black faux leather paper:
Flexfolie auf schwarzem Kunstleder Papier:
Flocked heat transfer vinyl on black faux leather paper:
Flockfolie auf schwarzem Kunstleder Papier:
White faux leather paper with my own stamp and edited with clear embossing powder:
Weißes Kunstleder Papier mit meinem Stempel bestempelt und mit klarem Embossingpuder bearbeitet:
And now one of the design I love so much - the cute little sewing machine! This is a design by Carina Gardner, you can get this file in the Silhouette Store (Design ID #73533).
Thanks to Carina for the permission to use this design for my blogpost!
The key chain on the left side wasn't glued, it was sewn together. And I use it as a bag pendant!
Und nun eines der Designs, die ich so sehr mag - die niedliche kleine Nähmaschine! Diese Datei ist von Carina Gardner, man bekommt sie im Silhouette Store (Design ID #73533).
Vielen Dank an Carina für die Erlaubnis, dieses Design für diesen Blogbeitrag zu nutzen!
Der Anhänger auf der linken Seite wurde nicht geklebt, sondern zusammengenäht. Und ich nutze ihn als Taschenanhänger!
Visit and like me on Facebook!

Attention! It is not allowed to copy
or use my posts, photos, pattern, templates or files for business or selling!!!
Wichtig! Es ist untersagt, meine Beiträge, Fotos, Schnittmuster, Vorlagen oder Dateien zu kopieren oder gewerblich oder zum Verkauf zu nutzen!!!
Wichtig! Es ist untersagt, meine Beiträge, Fotos, Schnittmuster, Vorlagen oder Dateien zu kopieren oder gewerblich oder zum Verkauf zu nutzen!!!


Very cool - you are so creative.
ReplyDeleteThank you for sharing at http://image-in-ing.blogspot.com/2016/04/worlds-best-meatloaf-recipe-wordful.html
A fun summer project! Thank you!
ReplyDeleteGreat gift idea - or thinking ahead, stocking stuffers! Thanks for sharing at the DIY party at Pleasures of the NW.
ReplyDeleteSUCH a neat idea!
ReplyDeleteThanks for joining Cooking and Crafting with J & J!
Wow so many design options! We love having you join us each week at Celebrate Your Story and hope you join us again next week.
ReplyDeleteThank you so much for sharing with us at Merry Monday. We hope you’ll come to the new party. We’re celebrating our anniversary with a big Giveaway.
ReplyDeleteWhat a fun idea! I know my boys would love this!
ReplyDeleteWhat a fun idea! I love that you could make it your own! Thank you for sharing with us at the #HomeMattersParty
ReplyDeleteThose are super adorable!! Great tutorial too! Thanks for sharing at our DIY Crush Craft Party!! Hope to see you this Thursdays at 7pm EST. Have a great rest of the week! www.diy-crush.com
ReplyDelete