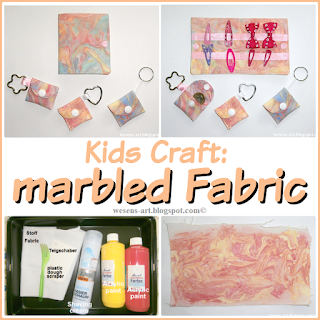
When I saw Hannah's great tutorial "How to marble fabric"
I thought that it would be great to do this with my granddaughter.
And she love it to make her very own fabrics.
And this is what we use:
roasting pan
white fabric
acrylic paint
shaving cream
dough scraper
plastic fork
Als ich Hannah's tolle Anleitung "How to marble fabric"
(wie man Stoffe marmoriert) sah, dachte ich, dass es klasse wäre, das mit meiner Enkelin zu machen.
Und sie liebt es, ihre ganz eigenen Stoffe zu machen.
Und das benutzen wir dafür:
Fettpfanne
weißen Stoff
Acrylfarbe
Rasierschaum
Teigschaber
Plastikgabel
We sprayed a bunch of shaving cream in the roasting pan.
Wir sprühten eine dicke Schicht Rasierschaum in die Fettpfanne.
Then we smoothed it with a dough scraper.
Dann haben wir es mit dem Teigschaber geglättet.
Then we dripped some acrylic paint onto the shaving cream.
Dann tropften wir etwas Farbe auf den Rasierschaum.
My granddaughter took the fork and:
Meine Enkelin nach die Gabel und:
After she was done with her design, we put the fabric onto the paint and pressed it on gently.
Als sie mit ihrem Design fertig war, haben wir den Stoff aufgelegt und vorsichtig angedrückt.
Then we counted slowly till 30.
After that I removed the fabric:
Dann haben wir langsam bis 30 gezählt.
Danach habe ich den Stoff entfernt:
We went to the sink and rinsed the fabric under cold water till the water was clear.
Dann haben wir den Stoff am Waschbecken unter kaltem Wasser gespült, bis das Wasser klar blieb.
Let it dry.
Trocknen lassen.
We ironed the dried fabric and then it was ready for sewing.
I sewed a hairclip holder and a few little coin purses.
Wir bügelten den trockenen Stoff und dann war er bereit zum Nähen. Ich nähte einen Haarclip-Halter und einige kleine Münztäschchen.
Till now we've done it 3 times but she wants more and more.
She said when she is 4 years old (next month) she needs 4 different little bags.
Bis jetzt haben wir das 3x gemacht und sie will immer mehr.
Sie sagt, wenn sie 4 Jahre alt ist (nächsten Monat), braucht sie 4 verschiedene kleine Taschen.
Visit and like me on Facebook!
Attention! It is not allowed to copy or use my posts, photos, pattern, templates or files for business or selling!!!
Wichtig! Es ist untersagt, meine Beiträge, Fotos, Schnittmuster, Vorlagen oder Dateien zu kopieren oder gewerblich oder zum Verkauf zu nutzen!!!


Wow what a fun craft to make with you granddaughter. Thanks for linking to Cooking & Crafting with J & J party.
ReplyDeleteSuch a cute idea!
ReplyDeleteThanks for joining the Cooking & Crafting with J & J Link Up! :)
These are very cute! I've done something similar with paper, but never thought about fabric...I have some napkins in there I've been meaning to do something with!
ReplyDeleteThank you for linking up at http://image-in-ing.blogspot.com/2015/06/nesting.html
ReplyDeleteHow much fun! This would be such a blast to do with kiddos this summer! Thanks for sharing!
ReplyDeletemust try this! Thanks for linking up! #bloggersbrags
ReplyDeleteOh wow, I love this!!! So definitely pinning this and must try it myself!! Thank you for joining our Oh My Heartsie Girl Wordless Wednesday Link Party.. Have a great day, co-host Evija @Fromevijawithlove xx
ReplyDeleteThis is such a cute idea. My girls (and my little guy) would absolutely love to do this. And it goes along great with my plan to start learning to sew and teach them to sew. What a great craft for the summer.
ReplyDeleteThis would fit perfectly with my Littles Learning Link Up. It is a weekly post filled with craft and activity ideas, tips, guest posts, and round ups all revolving around young children (infant through young elementary). I invite you to stop by and share.
http://totsandme.blogspot.com/2015/06/littles-learnng-link-up-chimpanzee-fact.html
Have a great day.
Love this. Perfect rainy day craft!
ReplyDeleteThis is a great idea! My daughter will love it!
ReplyDeleteWhat a fun project this will be for the girls. Thank you for sharing with the Clever Chicks Blog Hop! I hope you’ll join us again next week!
ReplyDeleteCheers,
Kathy Shea Mormino
The Chicken Chick
http://www.The-Chicken-Chick.com
This looks like a really cool project for kids! Thanks for linking up at the Stitch It, Blog It, Share Link Party. I hope you’ll join us every Sunday night at 7 with more of your creative sewing projects.
ReplyDelete~Bonnie @ Behind the Seams Sewing
I just found your beautiful tutorial in a link up party and wanted to invite you to stop by DIY Crush to submit your craft tutorials and patterns to be featured! It's a great ad opportunity! https://www.diy-crush.com/blog/submit-your-tutorial/
ReplyDeleteHow cute! I really like how easy it is, and how great it turned out! Thanks so much for linking up with Idea Box. :)
ReplyDeletevery cute!!!!
ReplyDeleteI love this, I have shared, thank you for sharing on #wednesdayswisdom
ReplyDeleteThis is amazing! Can't wait to do this with my daughter this summer.
ReplyDeletethank you very much for joining in and making our Bowdabra Crafty Saturday Showcase, we will look forward to seeing your post next Saturday.
ReplyDeleteWarm Regards,
The bowdabra team
This is a great craft. Perfect for changing up some fabric that you're not to fond of! I found you from the Home and Garden Group link party :) thanks for posting!!
ReplyDeleteCongratulations! This post is going to be featured over at Diana Rambles tomorrow and has been pinned in the Featured at Diana Rambles board at Pinterest, Tweeted, Facebook, and Recommended on G+. Please grab a featured button off my button page or via the post guidelines graphic. Thanks for sharing this awesome idea!
ReplyDelete