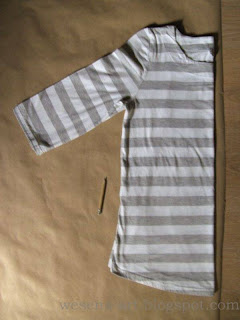
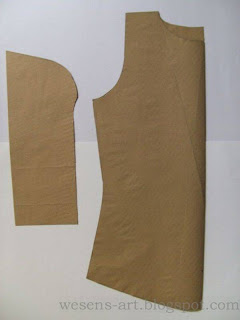
1 DIY-Schnitt = 5 verschiedene Shirts:
Erst habe ich mir ein Schnittmuster von einem bequemen Shirt gemacht. (Das geht natürlich auch mit Kinderkleidung!)
1 DIY pattern = 5 different shirts:
First I've made a pattern from a comfortable shirt.
(It also works with children's clothes!)
(It also works with children's clothes!)
Mit diesem Schnittmuster habe ich dann experimentiert und nun habe ich 5 verschiedene Shirts!
Die ersten 3 sind mit 3/4 langen Ärmeln:
I experimented with this pattern and now I have 5 different shirts!
The first 3 are with 3/4 long sleeves:
Detail:
(Kleine Anleitung zum Kräuseln der Kanten:
Einen engen Zick-Zack-Stich nutzen und den Stoff beim Nähen dehnen!)
(Little tutorial for ruffling the edges:
Use a close zig-zag stitch and stretch the fabric while sewing!)
(Kleine Anleitung zum Kräuseln der Kanten:
Einen engen Zick-Zack-Stich nutzen und den Stoff beim Nähen dehnen!)
(Little tutorial for ruffling the edges:
Use a close zig-zag stitch and stretch the fabric while sewing!)
Dieses ist mit 1/2 langen Ärmeln:
This one is with 1/2 long sleeves:
Dieses ist mit langen Ärmeln:
This one is long-sleeved:
Da das Bild etwas unscharf ist, hier noch eins:
Cause the photo is slightly blurred, here another one:


Da warst du aber fleißig - und so schöne Shirts sind das geworden. Gefällt mir sehr gut. Hätte gar nicht gedacht, dass man auf diese Art so einen guten Schnitt bekommt. LG Anne
ReplyDeleteYou are so clever to make these different shirts from the one pattern. Do you have a tutorial for ruffling the edge of the sleeves?
ReplyDeleteKay
jerryandkay.blogspot.com
Love your blog,thanks for sharing!
ReplyDeletewww.blissfulsewing.blogspot.com
Looks great! I like how you changed each top up~
ReplyDeleteDie Idee finde ich richtig toll und vor allem scheint es auch recht schnell zu gehen.
ReplyDeleteMuss ich mal ausprobieren, da ich mich mit Oberteilen meist etwas schwer tue.
Ich wünsche noch einen schönen Mittwoch-Abend.
LG Shantay
Such cute shirts! I love the orange and yellow striped one.
ReplyDeleteThanks so much for linking to the party and sharing with us!
We are your newest followers!
Hugs,
Patti
Wunderbar!
ReplyDeleteToo cute!! They all turned out sew (heehee) nice!!
ReplyDeletexoxo
Karena
Art by Karena
2012 Artists Series
'Love it! Thanks for all the cute ideas! -Marci
ReplyDeleteAll of them are so pretty! Great ideas!
ReplyDeleteI think this pattern is also IDEAL FOR MAKING these fashion shirts that are WAY LONGER at the back than at the front. Your basic shape is perfect for doing that. Just cut the back a bit longer and cut the front curved upwards rather than downwards. Hope I'm clear.... L0)
ReplyDeleteAnyhow, congratulations with your 5 new shirt designs. I love the orange one in particular. And, thank you again for linking it up with us at our party, http://www.finecraftguild.com/party/
That is a brilliant way to update t-shirts. Great idea thanks.s,
ReplyDeleteawesome tutorial! can't wait to try it
ReplyDeletefollowing from the GFC blog hop!
megancamille.blogspot.com
These are some great shirts! I need to try to learn to do the ruffled edge again. Tried once but quit in frustration. My machine has been serviced since then so maybe it's time to give it another try!
ReplyDeleteLove these shirts! I would love to make these soon. Thanks so much for linking up to Creative Thursday this week. I can't wait to see what you link up next week. Have a wonderful weekend.
ReplyDeleteMichelle
That's very clever! I'll try it later Thanks for sharing
ReplyDeletehttp://sparkleandco.blogspot.com ( from the piece o' cake linky )
Cute shirt redos- always looking for new ways to remake clothing!
ReplyDeleteMy favorite is the striped orange one! Very cute! :)
ReplyDeleteI haven't seen anyone do that ruffly edge since my mom did when I was a kid. It's SO cute!
ReplyDeleteWow - you did a brilliant job - I love it!
ReplyDeleteLove the stripes!
ReplyDeleteGreat selection of shirts there! And thanks for the tip on ruffling the edges of the shirt too!
ReplyDeleteThanks for linking to a Round Tuit!
Hope you have a fabulous week!
Jill @ Creating my way to Success
http://www.jembellish.blogspot.com/
...habe Dich in den unendlichen Weiten des WWW in Ursulas Kreativparty http://www.cutelicious.info/
ReplyDeleteentdeckt und finde Deine Idee genial, mein Favorit ist das Shirt mit dem dreieckigen Einsatz -ganz toll gelungen- natürlich alle anderen auch ;-)))
einen schönen Wochenanfang wünscht Dir Traudi
So cute, although if I tried to make them I'm sure they would not turn out the same. :)
ReplyDeleteMarcie @ www.IGottaTryThat.com
What great shirts!! I love all the different styles you put into them. Thank you for sharing at Sharing Saturday!!
ReplyDelete