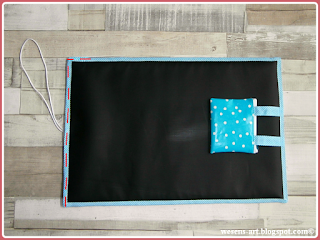
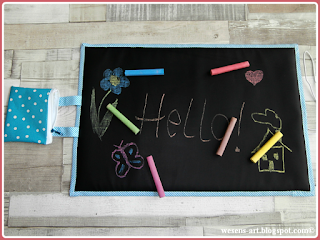
Traveling can be very boring for kids / toddlers.
Whether in a plane, car, train or hotel - this travel chalkboard can be used everywhere!
It is easy to make one, and most of the things I've used I had at home.
What you need:
piece of oil cloth (an old oilcloth tablecloth)
old (bamboo) placemat
chalk cloth (found it at my local fabric store)
bias tape
zipper
button
round elastic cord
chalk
Reisen kann für Kids / Kleinkinder so langweilig sein.
Ob im Flugzeug, Auto, Zug oder Hotel - diese Reise-Tafel kann überall verwendet werden!
Sie ist leicht herzustellen, und die meisten Dinge, die ich verwendet habe, hatte ich daheim.
Was man braucht:
Wachstuch (alte Wachstuch-Tischdecke)
altes (Bambus-) Tischset
Tafelstoff (gefunden beim örtlichen Stoffhändler)
Schrägband
Reißverschluss
Knopf
runde Gummikordel
Kreide
At first, we sew a small bag for the chalk:
take a piece of the olicloth, about 13 x 22cm and a piece of an endless zipper (about 15cm long). Place the zipper to one of the short edges of the oilcloth (right side of the zipper onto right side of the oilcloth) and sew it on.
Zunächst nähen wir eine kleine Tasche für die Kreide:
ein Stück Wachstuch, etwa 13 x 22 cm und ein ca. 15 cm langes Stück Endlosreißverschluss. Den Reißverschluss auf eine kurze Seite des Wachstuchs legen (rechte Seite des Reißverschlusses auf die rechte Seite des Wachstuchs) und annähen.
Fold the zipper up and sew again.
Den Reißverschluss umklappen und wieder nähen.
Take 2 strips of the bias tape, both about 15 cm long. Fold them half and stitch along the long sides.
2 Streifen Schrägband nehmen, beide etwa 15 cm lang. Mittig falten und entlang der langen Seiten nähen.
Place the 2 strips onto the other short side of the oilcloth.
Die beiden Streifen an die andere kurze Seite des Wachstuchs legen.
Fold the edge of the zipper to the edge with the strips and stitch along the edge.
Die Kante mit dem Reißverschluss an die Kante mit den Streifen falten und entlang der Kante nähen.
Open the zipper, fold the zipper up and stitch
(as shown in the next photo).
(as shown in the next photo).
Den Reißverschluss öffnen und wie im nächsten Foto gezeigt, abnähen.
Fold it together (right side on right side, the strips must be inside) and close the zipper again.
Zusammenfalten (rechte Seite auf rechte Seite, die Streifen müssen innen sein) und den Reißverschluss wieder schließen.
Stitch along both sides (the zipper must be half open).
Then cut the corners.
Entlang der beiden Seiten nähen, der Reißverschluss muss dabei halb geöffnet sein. Dann die Ecken abschneiden.
Turn the bag inside out.
Die Taschen von innen nach außen wenden.
Now to the chalkboard:
place the place mat onto the chalk cloth and oilcloth. Cut around the edges, leave about 1cm space at every edge.
Nun zur Tafel:
das Tischset auf Tafelstoff und Wachstuch legen. Entlang der Kanten schneiden, mit etwa 1 cm Abstand zu jeder Kante.
Plug the chalk cloth and the oilcloth together, left side on left side (I used clips because needles would make holes).
Tafelstoff und Wachstuch aufeinander stecken, linke Seite auf linke Seite (ich habe Clips genommen, weil Nadeln Löcher machen würden).
Place the strips of the bag centered on one short edge of the cloth.
Die Streifen der Taschen zentriert an eine der kurzen Kanten legen.
Stitch on the strips.
Die Streifen annähen.
Stitch the elastic cord centered onto the edge of the right side only of the oilcloth:
Die Gummikordel mittig an den Rand der rechten Seite nur des Wachstuchs nähen:
Sew the bias tape round the edges, leave the side with the cord open.
Schrägband entlang der Kanten annähen, die Kante mit der Gummikordel offen lassen.
Plug the place mat into the chalk cloth and oilcloth.
Das Tischset hinein schieben.
Close the open edge by stitching on the bias tape.
Die offene Kante durch annähen vom Schrägband schließen.
Fix the button over the elastic cord.
Den Knopf über der Gummikordel befestigen.
And it's done!
Und fertig!
Roll it together for transport or storing and the chalk is also protected!
Zum Transportieren oder Lagerung einfach zusammen rollen, und die Kreide ist auch geschützt!
Visit and like me on Facebook!
Attention! It is not allowed to copy
or use my posts, photos, pattern, templates or files for business or selling!!!
Wichtig! Es ist untersagt, meine Beiträge, Fotos, Schnittmuster, Vorlagen oder Dateien zu kopieren oder gewerblich oder zum Verkauf zu nutzen!!!
Wichtig! Es ist untersagt, meine Beiträge, Fotos, Schnittmuster, Vorlagen oder Dateien zu kopieren oder gewerblich oder zum Verkauf zu nutzen!!!


What a very fun idea! Love it!
ReplyDeleteGreat idea! Love how portable it is! Thanks for sharing!
ReplyDeletewhat a great idea I love how it all goes together in one portable place.
ReplyDeletecome see us at http://shopannies.blogspot.com
What a great idea! I'll have to try to make some for Christmas gifts. Pinned. :)
ReplyDeleteThis is cool. I am not really a sewer but I am going to give it a try. I think my granddaughter will love it.
ReplyDeleteThis is a neat idea!
ReplyDeleteI would love for you to share this with my Facebook Group for recipes, crafts, and tips:
https://www.facebook.com/groups/pluckyrecipescraftstips/
Thanks for joining Cooking and Crafting with J & J!
You have such original and creative ideas! Thanks for joining us again at Celebrate Your Story and keep those ideas coming!
ReplyDeleteThis is very cool! Great idea! I found your site from the showofflinkparty
ReplyDeleteWhat a perfect idea! Thanks for sharing.
ReplyDeleteGenial!!! Meine beiden Toechter haetten damit total viel Spass, wenn wir unterwegs sind! Super Idee und sieht toll aus! Danke fuer die Inspiration! Schoenes Wochenende!!!
ReplyDeleteSuch a great idea! My kids would love this. We’d be honored to have you share this at our weekly link party. http://www.thelifeofjenniferdawn.com/2016/07/diy-painted-projects-for-home-and.html Hope to see you there!
ReplyDeleteTraveling can be tough both for kids and adults, but that travel chalkboard can be a life saver. I have not seen any chalk cloth around here, but I will keep my eyes open from now on.
ReplyDeleteI am featuring this next week at Two Uses Tuesday party, so don't forget to stop by and grab your button.
This is such a fun project! Love the idea! I've not see the chalk cloth either, but would love to find some! Pinned. Thanks for sharing with us at Snickerdoodle Sunday!
ReplyDeleteHi there
ReplyDeleteJust stopped by to let you know that I featured this on my Round Tuit post this week!
A Round Tuit 319
Thanks again for linking up! Hope you have a great week!
Jill @ Creating my way to Success
This is such a cute and clever idea, looks like a great gift for Christmas.I would love to have you share on #OMHGFF
ReplyDeleteHope you have a great weekend!
Karen
Oh My Heartsie Girl