Saturday, June 30, 2012

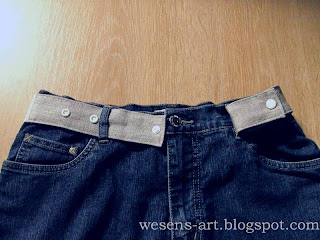
Statt eines Gürtels / Instead of a belt

Wenn die Hose rutscht, braucht man einen Gürtel.
Aber gerade für kleine Kinder ist es schwierig, einen Gürtel auf- und zuzumachen.
Hier ist die Lösung! Keine Gürtelschnallen mehr!
Einfach, schnell gemacht, praktisch und bequem!
(Natürlich nicht nur für Kinder!)

You need a belt, if the pants slips.
But especially for kids it´s not easy to open and close a belt.
Here is the solution! No belt buckles anymore!
Simply, quickly made, practical and comfortable!
(Of course, not just for kids!)
instead of a belt 1    wesens-art.blogspot.com
Was man dafür braucht:
Velours-Elastic-Bund oder Elastic-Bund
ein Stück Stoff
Druckknöpfe

Die Länge des Velours-Elastik-Bunds am besten an einer passenden Hose abmessen.

What you need:
velours-elastic or thick elastic
a piece of fabric
snaps

The length of the velours-elastic is measured at a matching pant.
instead of a belt 2    wesens-art.blogspot.com
In der gleichen Länge den Stoffstreifen zuschneiden, etwa 3x so breit, wie der Velours-Elastik-Bund.

Cut the fabric into a strip in the same length and about 3x as wide as the velours-elastic.
instead of a belt 3    wesens-art.blogspot.com
Den Stoff in der Breite des Velours-Elastik-Bunds nähen und in 2 Stücke teilen.

Sew the fabric in the width of the velours-elastic and cut out into 2 pieces.
instead of a belt 4    wesens-art.blogspot.com
Nun den Velours-Elastik-Bund in die offenen Enden der Stoffstreifen stecken und mit einem Zick-Zack-Stich zunähen.

Now put the ends of the velours-elastic into the open ends of the fabric stripes and sew with a zig-zag stitch.
instead of a belt 5    wesens-art.blogspot.com
Dann werden noch Druckknöpfe angebracht (ich habe KamSnaps genommen).

Then install snaps on it (I used KamSnaps).
instead of a belt 6    wesens-art.blogspot.com
Und fertig! Ich hab gleich noch mehr gemacht...

And ready! I have made several...
instead of a belt 1    wesens-art.blogspot.com
Und so werden sie benutzt:
Einfach durch die Gürtelschlaufen ziehen und anknöpfen!

And so they are used:
Simply pull through belt loops and buttoning!
instead of a belt 7    wesens-art.blogspot.com
instead of a belt 8    wesens-art.blogspot.com
Jetzt muss man keinen Gürtel mehr öffnen, nur noch die Hose!

Now you don´t have to open a belt anymore, only the pants!

Wichtig! Es ist untersagt, meine Beiträge, Fotos, Schnittmuster, Vorlagen oder Dateien zu kopieren oder gewerblich oder zum Verkauf zu nutzen!!!
Attention! It is not allowed to copy or use my posts, photos, pattern, templates or files for business or selling!!!

Quilling: Noch ein Schmetterling / Quilling: Again a Butterfly

Ich habe noch einen Schmetterling gemacht:
I've made ​​another butterfly: 
(Click any Photo to enlarge)
another Butterfly 1     wesens-art.blogspot.com
another Butterfly 2     wesens-art.blogspot.com
another Butterfly 3     wesens-art.blogspot.com
another Butterfly 4     wesens-art.blogspot.com
(Mein kl. Quilling-Tutorial findet ihr über diesen Link)   
(You find my little Quilling-Tutorial here!)

Und mehr Quilling hier!
And more quilling here!

Wichtig! Es ist untersagt, meine Beiträge, Fotos, Schnittmuster, Vorlagen oder Dateien zu kopieren oder gewerblich oder zum Verkauf zu nutzen!!!
Attention! It is not allowed to copy or use my posts, photos, pattern, templates or files for business or selling!!!

Tuesday, June 26, 2012

Wendbare Tasche mit passendem Loop / Reversible bag with a matching infinity scarf

Wieder eine Tasche für meine Tochter, mit dazu passendem Loop-Schlauchschal.
Another bag for my daughter, with a matching infinity scarf.
Und so gehts:
Stoff zuschneiden für die Tasche: je 1x von Stoff 1 und 2 und 1x aus festerem Stoff (zB. Segeltuch), der zwischen die beiden Stoffe kommt.
Für aufgesetzte Taschen: je 2x für Stoff 1 und 2
Für die Träger: je 2x von Stoff 1 und 2
Maße siehe Foto! (Können natürlich ganz nach Wunsch geändert werden!)
How to make:
Cut fabric for the bag: 1x of fabric 1 and 1x of fabric 2 and 1x of Canvas (this will go between the fabric 1 and 2, to give body to the bag).
For patch pockets: 2x of fabric 1 and 2x of fabric 2
For the straps: 2x of fabric 1 and 2x of fabric 2
Look at the photo for the dimensions! (Can be changed as desired!)
Stoff für die aufgesetzten Taschen umnähen und auf die rechten Seiten der Stoffe 1 und 2 nähen, wie im Foto angezeichnet.
Stitch up the fabric for the pockets and sew them onto fabric 1 and 2, as marked at the photo.
Festeren Stoff auf die linke Seite von Stoff 1 legen.
Stoff mit aufgesetzten Taschen mittig falten (rechts auf rechts) und die Seiten zusammennähen.
Set canvas on the left side of fabric 1.
Fold the fabric in the middle (right on right) and stitch the sides together.
An den Seitennähten markieren (unten).
Mark on the side seams (below).
Stoff auffalten und die markierten Ecken umschlagen (siehe Foto).
Unfold the fabric and fold back the marked corners (see photo).
An der entstandenen Linie nähen…
Sew on the resulting line...
...und abschneiden.
...and cut off.
Taschenteile links auf links ineinander setzen.
Put one part of the bag into the other.
Rand feststecken.
Stuck the edges.
Rand mit Zickzack-Stich nähen.
Sew the edges with a zig-zag stitch.
Nun die Träger:
Stoffe erst der Länge nach falten, auffalten und die Seiten zu der entstandenen Linie falten und bügeln.
Now the straps:
Fold the fabrics lengthwise, unfold and fold the side to the resulting line. Then iron it.
Eins von Stoff 1 auf eins von Stoff 2 legen.
Put one of fabric 1 onto one of fabric 2.
Aufeinander nähen, dabei an den schmalen Seiten ca. 3 cm offen lassen.
Sew together, leaving the small sides about 3cm open.
An den offenen Seiten schmal umschlagen und nähen (siehe Foto!).
Stitch up each of the open sides (see photo!).
Nun eine Lasche zum Verschließen der Tasche nähen.
(Ich habe dazu Stück Stoff in der Größe 10 x 7 cm genommen.)
Bügeln und umnähen wie die Träger und ein Knopfloch einnähen.
Now sew a little flap for closing the bag.
(I've used a 7 x 10 cm piece of fabric.)
Iron and sew like the straps and sew a buttonhole.
Diese Lasche nun mittig an den Rand der Tasche nähen.
Sew this flap on the middle of the edge of the bag.
Jetzt werden die Träger an den Rand der Tasche genäht. (Dabei die geteilten Enden der Träger auf jeder Seite der Tasche anbringen.)
Now sew the straps onto the edges of the bag. (Sew the split ends of the straps on each side of the bag.)
Das habe ich vorher vergessen:
Einen Streifen von Stoff 1 und 2 in der doppelten Breite der Tasche umbügeln, wie bei den Trägern.
I forgot before:
A strip of fabric 1 and 2 in the double width of the bag, iron it like the straps.

Diese Streifen brauchen wir für den Rand der Tasche!
We need it for the edge of the bag!
Nun die untere Seite jedes Streifens an die Tasche nähen (siehe Foto).
Now sew the lower side of each strip on the bag (see photo).
Wenn die Streifen auf der Außen- und Innenseite angenäht sind, werden sie am oberen Rand zusammen genäht. (Ich habe noch einen Karabinerhaken angebracht, um einen Schlüssel einzuhängen.)
After sewing the stripes at the outside and inside, sew them together on the top. (I've also attached a snap hook, to hang a key on.)
Jetzt nur noch einen Knopf auf der Außen- und Innenseite der Tasche anbringen.
Now attach a button on the outside and the inside of the bag.
Die Tasche ist nun fertig!
The bag is ready now!

Jetzt noch ganz schnell ein dazu passender Loop:
Now even quickly a matching infinity scarf:

Einen 155 x 41 cm Streifen Stoff zuschneiden.
Diesen der Länge nach falten und bügeln.
Cut out a 155 x 41 cm stripe of the fabric.
Fold the fabric lengthwise and iron it.
Lange Seite des Stoffs nähen.
Sew the long side of the fabric.
Stoff umdrehen.
Die offenen Seiten (rechts auf rechts) aufeinander legen.
Turn the fabric inside out.
Take the open side and put them together (right on right).
So weit es geht zusammennähen.
Sew it together as long it goes.
Nun die letzte Naht schließen.
Now close the end.
Hier sind nun Fotos von der Tasche mit passendem Loop:
Here are the photos of the bag and the matching infinity scarf:

Wichtig! Es ist untersagt, meine Beiträge, Fotos, Schnittmuster, Vorlagen oder Dateien zu kopieren oder gewerblich oder zum Verkauf zu nutzen!!!
Attention! It is not allowed to copy or use my posts, photos, pattern, templates or files for business or selling!!!

Sunday, June 24, 2012

3-D Buchstaben DIY / 3D Letters DIY

HELLO WORLD
Ich habe 3-D Buchstaben aus alten Kartons gebastelt und mit Karten beklebt:

HELLO WORLD
I've made 3D letters from old cardboard and glue maps on it:
HELLO world 12   wesens-art.blogspot.com
 Und so hab ich es gemacht:
Einzelteile der Buchstaben auf Pappe zeichnen und ausschneiden.
And this is how I did it:
Draw all parts of the letters on cardboard and cut it out.
HELLO world 01   wesens-art.blogspot.com
Anschließend die Einzelteile mit Heißkleber zusammensetzen.
Then glue the pieces together with a glue gun.
HELLO world 02   wesens-art.blogspot.com
Großen Bogen Tonkarton in Streifen schneiden, um damit die Seiten der Buchstaben zu verkleiden.
Cut large sheets of construction paper into strips to cover the sides of the letters.
HELLO world 03   wesens-art.blogspot.com
Streifen so falten, dass sie genau passen.
Fold the strips that they fit exactly.
HELLO world 04   wesens-art.blogspot.com
Dann die Streifen ankleben. Ich habe dafür einen Klebestift benutzt.
Then glue the stripes on the letters. I've used a glue stick.
HELLO world 05   wesens-art.blogspot.com
Seiten aus einem alten Atlas schneiden, oder was ihr sonst wollt.
Cut out pages from an old atlas, or what you else want.
HELLO world 06   wesens-art.blogspot.com
Darauf die Buchstaben zeichnen und ausschneiden.
Then draw the letters on it and cut them out.
HELLO world 07   wesens-art.blogspot.com
Diese nur noch auf die Buchstaben kleben - fertig!
Glue it on the letters - ready!
HELLO world 08   wesens-art.blogspot.com
 
HELLO world 13   wesens-art.blogspot.com
Um die Buchstaben an die Wand zu kleben, habe ich auf der Rückseite Klebegummi angebracht. So kann ich sie immer wieder anders anbringen.
I use removable adhesive putty to put them on the wall.
So I can always put them different.
HELLO world 09   wesens-art.blogspot.com
Und so kann es an der Wand aussehen:
And so it may look on the wall:
HELLO world 10   wesens-art.blogspot.com
HELLO world 11   wesens-art.blogspot.com
HELLO world 14   wesens-art.blogspot.com
HELLO world 15   wesens-art.blogspot.com
 Detail:
HELLO world 16   wesens-art.blogspot.com

Wichtig! Es ist untersagt, meine Beiträge, Fotos, Schnittmuster, Vorlagen oder Dateien zu kopieren oder gewerblich oder zum Verkauf zu nutzen!!!
Attention! It is not allowed to copy or use my posts, photos, pattern, templates or files for business or selling!!!

Related Posts Plugin for WordPress, Blogger...