Thursday, August 2, 2012

Vase aus einem Coffee-To-Go Becher / Vase from paper coffee cup

Ihr seid zu einer Gartenparty eingeladen? Dann bringt doch mal ein paar Blumen in einer Vase mit!
You are invited to a garden party? Then bring some flowers in a vase for the host!
CoffeeCupVase wesens-art.blogspot.com
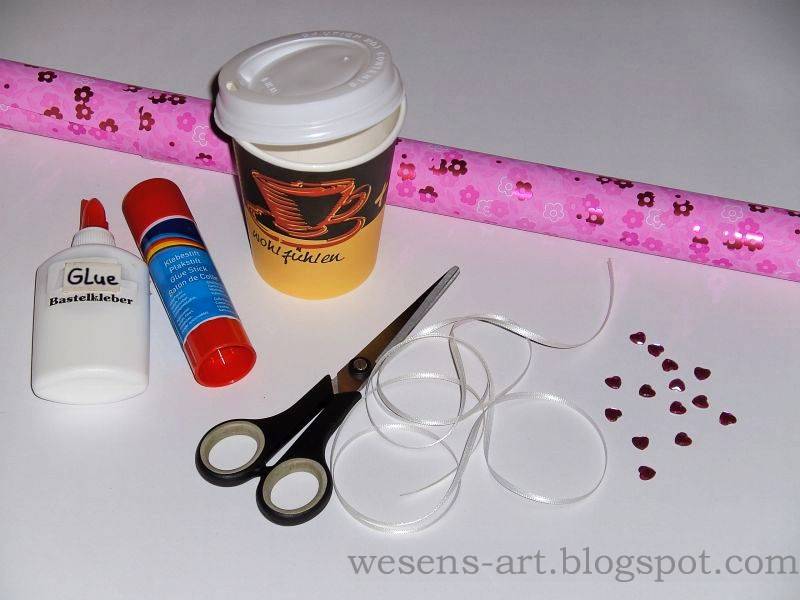
Was man braucht:
1 sauberen Coffee-To-Go Becher
Geschenkpapier
etwas Band
evtl. ein paar Strasssteine
Schere
Cuttermesser
Klebestift
Bastelkleber

What you need:
A clean paper coffee cup
gift wrap paper
some ribbon
possibly a few rhinestones
scissors
cutter knife
gluestick
craft glue
Becher mit Geschenkpapier bekleben.
Ein Kreuz in den Deckel schneiden.
Stick the gift wrap paper onto the cup.
Cut a cross into the lid.
Nun das Band um den Deckel binden und evtl. mit ein paar Strasssteinen bekleben.
Durch den Kreuzeinschnitt im Deckel stehen auch wenige Blumen gut in der Vase.
Now bind the ribbon around the lid and possibly glue a few rhinestones to the ribbon.
Also a few flowers stands good in the vase because of the cutting in the lid.

Visit and like me on Facebook!

Wichtig! Es ist untersagt, meine Beiträge, Fotos, Schnittmuster, Vorlagen oder Dateien zu kopieren oder gewerblich oder zum Verkauf zu nutzen!!!
Attention! It is not allowed to copy or use my posts, photos, pattern, templates or files for business or selling!!!


Sunday, July 29, 2012

Wie man Marzipanrosen macht / How to make marzipan roses

Marzipan Roses 09     wesens-art.blogspot.com

Zuerst formt man 10 ca. 1 cm kleine Kugeln.
First you form 10 small balls about 1 cm.
Marzipan Roses 01     wesens-art.blogspot.com
Jede Kugel in der Hand mit dem Finger flachdrücken.
Press each ball flat in the hand with your finger.
Marzipan Roses 02     wesens-art.blogspot.com
Die erste flachgedrückte Kugel von unten etwas zusammenrollen.
Roll the first flattened ball a little from underneath.
Marzipan Roses 03     wesens-art.blogspot.com
Nun die restlichen flachgedrückten Kugeln versetzt um die Erste setzen.
Now add the remaining flattened balls displaced to the first.
Marzipan Roses 04     wesens-art.blogspot.com
So sollte es dann aussehen:
Then it should look like this:
Marzipan Roses 05     wesens-art.blogspot.com
Nun die Rose vorsichtig umdrehen.
Now turn over the rose gently.
Marzipan Roses 06     wesens-art.blogspot.com
Das untere Ende mit einem Messer abschneiden.
Cut the bottom with a knife.
Marzipan Roses 07     wesens-art.blogspot.com
Jetzt hat die Rose eine sichere Standfläche.
Now the Rose has a secure standing position.
Marzipan Roses 08     wesens-art.blogspot.com
Umdrehen und fertig!
Turn over and ready!
Marzipan Roses 09     wesens-art.blogspot.com
Marzipan Roses 10     wesens-art.blogspot.com
 Die Funktioniert auch mit Marshmallow-Fondant und auch mit Knete!
It also works with Marshmallow Fondant and also with play dough!

Wichtig! Es ist untersagt, meine Beiträge, Fotos, Schnittmuster, Vorlagen oder Dateien zu kopieren oder gewerblich oder zum Verkauf zu nutzen!!!
Attention! It is not allowed to copy or use my posts, photos, pattern, templates or files for business or selling!!!

Thursday, July 26, 2012

Tutorial Bluse für Mia / Tutorial Blouse for Mia

blouse 18      wesens-art.blogspot.com
Diese Bluse ist in Größe 80/86, für kleine Mädchen im Alter von etwa 1 Jahr.
This blouse is in german size 80/86 (80-86 cm body length), for little girls in the age of around 1 year.

Die einzelnen Teile der Bluse aus Baumwollstoff ausschneiden.
An der Vorlage für das Rückenteil ist oben eine Markierung, an dieser Stelle die Vorlage umschlagen, dann hat man die Vorlage für das Vorderteil.
Cut the parts of the blouse out of cotton fabric.
There is a marked line on the template of the back side. Fold the template at this line, then you have the template for the front side.
blouse 01      wesens-art.blogspot.com
Nun die beiden kleinen Stoffteile für die Träger und den langen Stoffstreifen umnähen. (Das kleine Bild im nächsten Foto zeigt die Einstellungen meiner Nähmaschine.)
Now sew the outsides of the fabric parts for the shoulder strips and one side of the long fabric strip. (The little photo in the next photo shows the settings of my sewing maschine.)
blouse 02      wesens-art.blogspot.com
Den überstehenden Rand des Stoffes entlang der Naht abschneiden.
Cut out the overhanging fabric along the seam.
blouse 03      wesens-art.blogspot.com
Stoff an den Armausschnitten umschlagen und umnähen.
Fold the fabric at the armholes and stitch up.
blouse 04      wesens-art.blogspot.com
Nun Vorder- und Rückenteil an den Seiten zusammennähen und versäubern.
Now sew the sides of the front and the back together and neaten.
blouse 05      wesens-art.blogspot.com
Anschließend die Ränder des Halsausschnittes und die untere Kante umschlagen und umnähen. (Bitte den Halsausschnitt so breit umnähen, dass später Gummiband durchgezogen werden kann.)
Then fold the edges of the neckline and the bottom edge and stitch up. (Please sew the neckline a little wider, to pull later some elastic band.)
blouse 06      wesens-art.blogspot.com
blouse 07      wesens-art.blogspot.com
Jetzt werden die schmalen Seiten des langen Stoffstreifens zusammengenäht.
Now stitch up the small sides of the long fabric strip.
blouse 08      wesens-art.blogspot.com
Einen ca. 50 cm langen Streifen Gummiband an den Enden zusammen nähen.
4 Stellen im gleichen Abstand an der oberen Kante des Stoffes und am Gummi markieren.
Sew the ends of an around 50 cm of elastic band together.
Mark 4 points at the same distance on the top of the fabric and of the elastic band.
blouse 09      wesens-art.blogspot.com
Nun die markierten Stellen des Gummibandes an denen des Stoffes fixieren (siehe Foto).
Fix the marks of the elastic band on the marks of the fabric (see photo).
blouse 10     wesens-art.blogspot.com
Jetzt das Gummiband unter Spannung (Gummi stark ziehen) auf den Stoff nähen.
Now sew the elastic band under tension (pull the elastic band strongly) on the fabric.
blouse 11     wesens-art.blogspot.com
So sollte es anschließend aussehen:
Then it should look like this:
blouse 12     wesens-art.blogspot.com
Auch am unteren Ende von Vorder- und Rückenteil 4 Markierungen setzen.
Dann den Stoff mit dem Gummiband rechts auf rechts unter Spannung auf Vorder- und Rückenteil nähen.
Even set 4 marks at the bottom of the front and the backside of the blouse.
Then sew the fabric with the elastic band under tension on the blouse (right side on right side of the fabric).
blouse 13     wesens-art.blogspot.com
Nun je einen Streifen Gummiband durch den oberen Teil des Halsausschnittes von Vorder- und Rückenteil ziehen.
Now pull stripes of elastic band to the front and the backside of the neckline.
blouse 14      wesens-art.blogspot.com
Eine Seite eines Trägers umgeschlagen annähen und damit gleichzeitig das Gummiband fixieren.
Sew one side of the shoulder strips on the blouse and fix on the same time the elastic band.
blouse 15      wesens-art.blogspot.com
blouse 16      wesens-art.blogspot.com
An der anderen Seite den Stoff so lange über das Gummiband ziehen, dass von Seite zu Seite eine Länge von 20 cm entsteht. Nun den 2. Träger annähen und damit das andere Ende des Gummibandes fixieren.
Move the fabric over the elastic band till the length from side to side is around 20 cm. Now sew on the second shoulder strip and fix on the same time the other end of the elastic band.
blouse 17     wesens-art.blogspot.com
Und fertig ist die Bluse!
And then the blouse is ready!
blouse 18      wesens-art.blogspot.com
blouse 19     wesens-art.blogspot.com
blouse 20     wesens-art.blogspot.com
Und hier ist ein Foto von der Bluse, die ich am 17. Juli genäht habe (hier klicken):
And here is a photo from the blouse I've sewn at 17th of july (click here):
blouse violett     wesens-art.blogspot.com

Wichtig! Es ist untersagt, meine Beiträge, Fotos, Schnittmuster, Vorlagen oder Dateien zu kopieren oder gewerblich oder zum Verkauf zu nutzen!!!
Attention! It is not allowed to copy or use my posts, photos, pattern, templates or files for business or selling!!!

Sunday, July 22, 2012

Geschenkschachteln / Gift Boxes

Gift Boxes 06      wesens-art.blogspot.com
Was man braucht:
Papier
Schere
Bleistift

Schablonen auf das Papier übertragen.

What you need:
Paper
Scissors
Pencil

Transfer the templates to the paper.
(Click any photo to enlarge!)
Gift Boxes 01      wesens-art.blogspot.com
Gift Boxes 02      wesens-art.blogspot.com
Gift Boxes 03      wesens-art.blogspot.com
Nun ausschneiden und an den markierten Linie falten.
Now cut them out and fold at the marked lines.
Gift Boxes 04      wesens-art.blogspot.com
Zwei Seiten zusammenstecken.
Stuck two sides together.
Gift Boxes 05      wesens-art.blogspot.com
Geschenk einfügen und Schachtel schließen.
Insert the Gift and close the box.
Gift Boxes 06      wesens-art.blogspot.com

Wichtig! Es ist untersagt, meine Beiträge, Fotos, Schnittmuster, Vorlagen oder Dateien zu kopieren oder gewerblich oder zum Verkauf zu nutzen!!!
Attention! It is not allowed to copy or use my posts, photos, pattern, templates or files for business or selling!!!

Tuesday, July 17, 2012

Bluse für Mia / Blouse for Mia

Als ich diesen Stoff gekauft habe, wusste ich sofort, was ich daraus nähen würde...
 As I bought this fabric, I knew immediately what I have to sew...
 Es musste eine Bluse für meine Enkelin Mia werden!
 It had to be a blouse for my granddaughter Mia!
 
Für mein Tutorial für eine Bluse für kleine Mädchen klick hier!
For my tutorial for a little girls blouse click here!

Wichtig! Es ist untersagt, meine Beiträge, Fotos, Schnittmuster, Vorlagen oder Dateien zu kopieren oder gewerblich oder zum Verkauf zu nutzen!!!
Attention! It is not allowed to copy or use my posts, photos, pattern, templates or files for business or selling!!!
Related Posts Plugin for WordPress, Blogger...